Been busy since my last post.
Populated the main circuit turret board, components not yet soldered in.


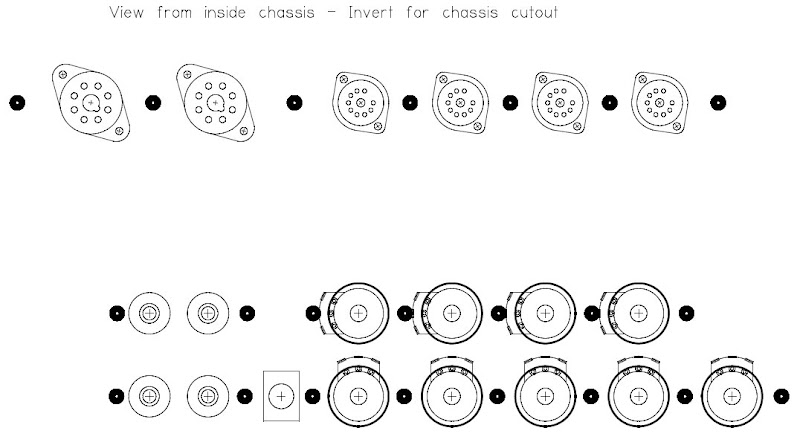
METAL WORK
- drilled all holes for front panel components (pots, switches, jacks, etc.)
- aligned and drilled holes for placement of front panel
- countersunk philips head screws bolted to main chassis
- punched out holes for tube sockets
- re-drilled to compensate for existing ventilation holes
- removed bulk metal from section of main chassis behind front panel
- there is a gap between the two pieces of metal because of the way the chassis box was manufactured
- laid out and marked chassis for transformers and capacitor board
- need to drill before placement of main circuit board


I used CADStd again to assist in drawing out the placement of controls and tube socket layout. It makes it easier to place components when you can work with a 1:1 drawing and move them as needed, knowing that the dimensions do not change.

CAPACITOR EYELET BOARD
I did, however, use good old graph paper for laying out the capacitor bank board and the main rectifier diode board. Much faster.

The method I am using for these boards is similar to what Fender used in their original tube guitar amps. A layered board system with components on the top board, and the bottom one used as insulation. This way, the board can be mounted directly to the chassis without standoffs, and without danger of shorting out.


The metal holes that the components are placed into are called "eyelets". I was able to mount about half of the eyelets when the staking tool broke. I resorted to shortening the eyelets and using brute force to expand the eyelets once in their holes. The 1/8" holes that hold the eyelets were made with a hand whitney punch. There's no comparison for getting a job done using the right tool for the job. An example is most of the work I am doing now - I am trying to reuse old parts in an attempt to be "green" and to save money. A lot of the work done thus far could have been completed much faster with all the money in the world, and all the tools that go into said money.
I digress...
The capacitor board and diode board were then populated without soldering.
I also twisted some stranded insulated copper wiring for the tube filament wiring: Here is the method I chose to twist the wire:
- place the 2 wires in a drill chuck
- clamp the end of the 2 wires in a vise
- holding the wire taut, activate the drill, spinning the wires
- after the wires are sufficiently twisted, remove from drill and vise
Some thoughts on the latest work.
Metalwork is very messy. My garage workspace is now littered with metal shavings. It is also dangerous. I have had enough scrapes in the past to know how to do the work that I am doing without too much injury.
OUTPUT TRANSFORMER
Before mounting the output transformer I wanted to be sure the wire connections that I intend to make would be the correct ones. I took the transformer to school and ran a 1kHz sine wave signal into a wire I was absolutely sure (and later would be verified) was a speaker connection (secondary). I took the following steps:
- measure input voltage
- measure output voltage
- calculate voltage ratio
- SQUARE both sides (impedance ratio)
- multiply both sides by expected speaker impedance
My calculations verified the proper wire connections to make (note I had extended the original wiring). This also confirmed the "thought" around the web that this particular transformer has a primary impedance of roughly 6k-OHMS.


NEXT STEPS
- drill transformer mounting holes
- drill/mark placement for power switch
- drill/mark placement for RCA reverb connections
- drill/mark placement for main circuit board
- fabricate standoffs for boards
No comments:
Post a Comment